
 Pin
Pin
This easy sourdough bread has become my go-to recipe for weekends when I want a golden crust and tangy flavor with minimal effort. The dough rises overnight and the loaf bakes up beautifully in the morning, filling the kitchen with irresistible aroma. With just a few pantry staples and a healthy starter, you are set for a loaf that transforms simple meals into something special.
Once I saw how well this method worked even on my very first try I felt like a bakery magician Every batch feels like an accomplishment especially when my family fights over the end pieces
Ingredients
- Organic white bread flour: for structure and chew I suggest weighing it for the best texture Use a high protein flour for a better rise
- Fine sea salt: gives flavor and controls fermentation Choose pure sea salt with no additives for the cleanest flavor
- Water: just filtered or tap as long as it tastes good to drink Hydration helps the dough develop an open crumb
- Sourdough starter: either homemade or store bought for tang and lift A strong active starter is key make sure it is bubbly after feeding for reliable results
- Optional rice flour: is lovely for dusting proofing baskets It helps prevent sticking and gives a pretty rustic edge
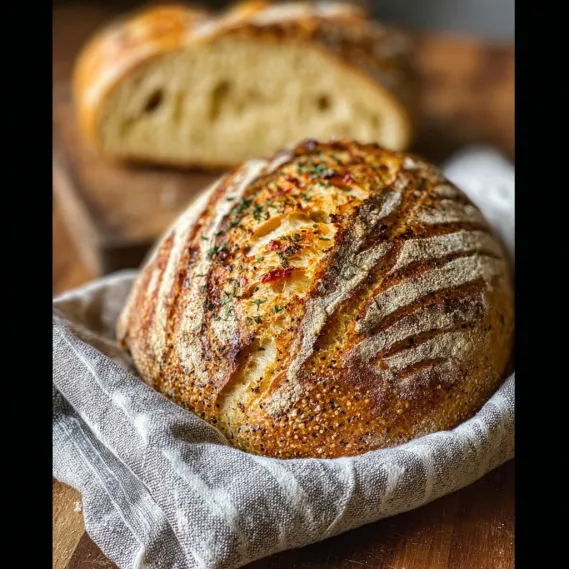
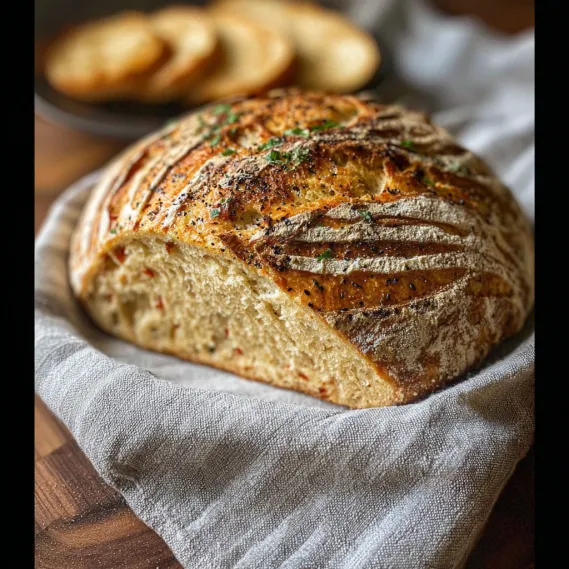
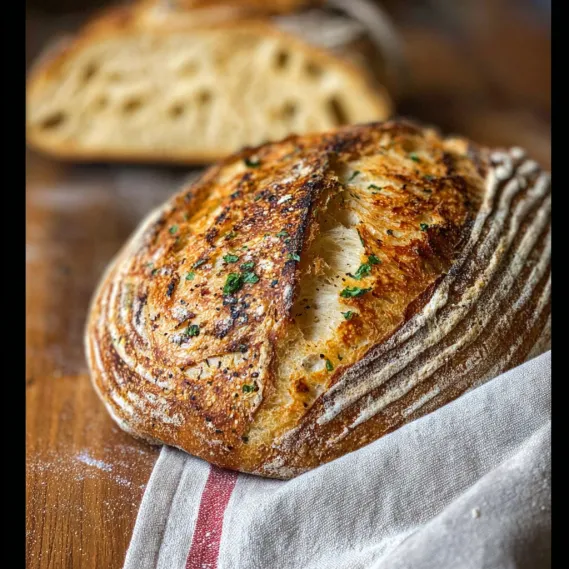
- Seeds: like fennel chia or caraway add crunch and flavor I love how one teaspoon fennel brings a subtle anise aroma that makes each slice special
- Swaps: like rye flour spelt or whole wheat lend nuttiness and nutrition Replace up to half a cup for your first loaves for easy handling
- Fresh or dried herbs: such as rosemary or thyme add color and fragrance Use organic for best results and rinse well if fresh
- Nuts olives or dried fruit: for character Look for plump olives and fresh nuts for best impact
Step-by-Step Instructions
- Feed and Prepare the Starter:
- Twelve hours before you plan to mix your dough feed the sourdough starter and leave it out at room temperature It should double in size within six hours If using a refrigerated starter you can use it straight from the jar if it has been fed in the past week
- Mix the Dough:
- In the evening weigh your flour into a medium bowl I always zero out the bowl weight before adding flour Add salt spices and any desired seeds In a separate bowl mix the starter and water until murky and well combined Then pour into the flour mixture Use a fork or wooden spoon to combine until no dry bits remain The dough will be sticky thick and somewhat rough Cover with a damp towel and let it rest for about fifteen minutes
- Stretch and Fold:
- With wet hands or a dough scraper perform a series of stretches and folds Pull a section of dough up stretch it high and fold it over itself Rotate the bowl and repeat for about thirty seconds This strengthens the dough Allow a short rest then repeat the stretch and fold once or twice more turning the dough over in the bowl at the end
- Bulk Fermentation Overnight:
- Cover the bowl and leave the dough at room temperature overnight Eight to twelve hours is typical A slightly cool kitchen might require a bit longer
- Check the Dough:
- In the morning the dough should look expanded with a softly domed surface Press with a floured finger If the indent springs back slowly it is ready If your dough seems under or over proofed it is still worth baking
- Prepare for Final Shape:
- Line a high sided bowl with parchment or dust a banneton with rice flour Carefully loosen the dough from the bowl edges and repeat the stretch and fold technique lifting and folding the dough two or three more times Each fold is followed by a brief rest Sprinkle the dough with seeds or flour if you wish
- Chill and Preheat:
- Cover and place the dough in the refrigerator for one hour Chilling helps firm up the dough and makes scoring easier Meanwhile preheat the oven for one full hour to ensure it is blazing hot Place your Dutch oven with lid in the oven during this time
- Score and Bake:
- Once the dough is chilled and the oven is preheated score the loaf deeply with a sharp knife Create one long slash or a decorative pattern Quickly place the loaf and parchment into the Dutch oven Replace the lid and bake at five hundred degrees Fahrenheit for twenty to twenty five minutes Remove the lid and bake ten to fifteen minutes more until deeply golden and the internal temperature is just over two hundred degrees Fahrenheit
- Cool and Slice:
- Let your bread rest on a rack for at least one hour before slicing The crust will crack as it cools and the crumb finishes setting
- Enjoy and Store:
- Serve toasted with butter olive oil or your favorite spread Wrap loosely in a kitchen towel for the first days then transfer to a bag or freeze slices for longer storage
 Pin
Pin
My favorite part of sourdough baking is choosing which seeds to sprinkle on top each time The scent of fennel and caraway always brings back memories of baking with my grandmother whose kitchen always smelled of warm bread
Storage Tips
After cooling wrap the loaf in a kitchen towel to keep the crust crisp For longer storage switch to a zip top bag or freezer bag Slice before freezing for easy toast anytime Stale slices make excellent croutons simply cube and toast
Ingredient Substitutions
Feel free to trade up to half a cup of the white bread flour for rye spelt or whole wheat flours Watch hydration as whole grains absorb more water Experiment with pumpkin or sunflower seeds olives or chopped dried fruit for different flavors
Serving Suggestions
This sourdough is at its best toasted Try serving with smashed avocado tomatoes a drizzle of olive oil or even your favorite nut butter It pairs beautifully with eggs soups and hearty salads
 Pin
Pin
Cultural and Historical Notes
Sourdough has ancient roots and was a staple in many cultures before commercial yeast Sourdough loaves develop bold flavor over long fermentation and are more digestible This slow baked bread continues a tradition that brings kitchens to life every morning
Recipe FAQs
- → What is the best flour to use?
Bread flour gives the best structure, but you may substitute up to half with whole grain, rye, or spelt flour for added flavor and texture.
- → Why does the dough require an overnight rise?
Long overnight proofing allows time for natural fermentation, resulting in better rise, flavor, and an open, airy crumb.
- → Can I make this loaf without a Dutch oven?
Yes, you can use a baking sheet covered with a metal or glass bowl to mimic steam for a crisp crust, though shape may be flatter.
- → How do I know my sourdough starter is ready?
Use your starter after it has doubled in size and is slightly past peak activity. It should smell pleasant and slightly tangy.
- → What flavor add-ins work well?
Try fennel, chia, caraway seeds, fresh herbs, nuts, dried fruit, olives, or a sprinkle of cheese for extra interest and aroma.
- → How should I store leftover bread?
Wrap in a kitchen towel for the first day or two. Move to a sealed bag or freeze slices for longer storage while keeping the crust fresh.