
 Pin
Pin
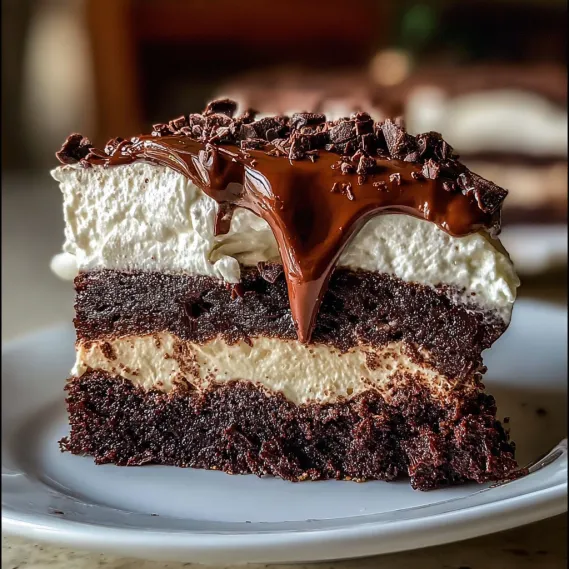
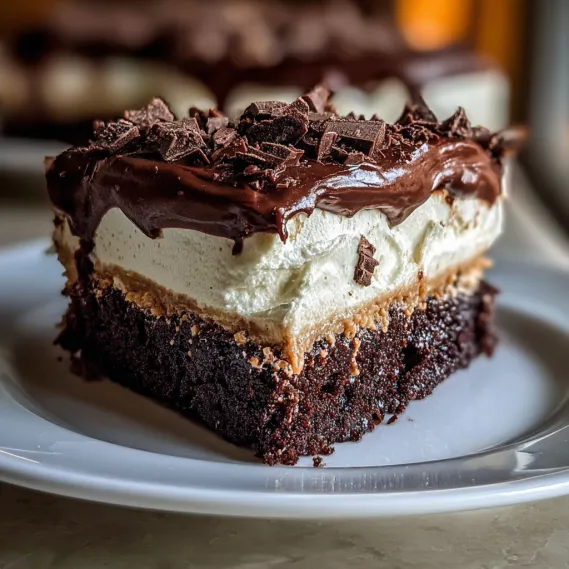
Brownie Refrigerator Cake is the ultimate mashup of creamy and fudgy with a refreshing chill. The base is thick and rich while the whipped cream cheese layer stays airy and cloud-like. I love how the chilled chocolate topping cracks softly under your fork and every bite is decadently cool. This is always a crowd favorite for potlucks birthdays or sunny afternoons on the porch.
The first time I made this was for a summer barbecue and it disappeared before anything else A friend begged me for the recipe so now I bring it to every family holiday
Ingredients
- Brownie mix and required additions: This is your shortcut to fudgy perfection Pick your favorite chewy brand for best results Choose a high cocoa content mix if you want deep flavor
- Cream cheese softened: for easy blending and smoothness Use full fat brick style for the richest texture
- Powdered sugar: easily dissolves into cream cheese for a silky sweet filling Sift for the smoothest result
- Vanilla extract: adds warmth and depth to the cream layer Use pure vanilla for the fragrance boost
- Heavy whipping cream chilled: so it whips into voluminous peaks Fresh heavy cream gives the fluffiest result not half and half
- Chocolate chips or chocolate frosting: for the glossy crowning layer Use semisweet chips for balance or pick frosting for speed
- Optional garnish: chocolate shavings sprinkles or a dusting of cocoa The extra flourish is fun and Insta worthy Pick a good chocolate bar for shaving or use a microplane
Step-by-Step Instructions
- Prepare the Brownie:
- Bake your brownie mix as directed on the package using a 9 by 13 inch pan Make sure it is fully cooled before the next step Warm brownies will melt the filling and make slicing tricky
- Build the Cream Cheese Filling:
- Beat cream cheese with powdered sugar and vanilla until perfectly smooth and fluffy Use a hand mixer on medium to make sure no lumps remain
- Whip the Cream:
- In a separate chilled bowl whip the heavy cream on medium high until stiff peaks form This can take three to five minutes Watch carefully to avoid overwhipping
- Combine the Cream Layers:
- Gently fold the whipped cream into the cream cheese mixture moving in slow sweeping motions This keeps your filling as light as possible
- Slice and Layer:
- Carefully slice your cooled brownie horizontally into two thin layers I use a large serrated knife and go slow for even layers
- Assemble:
- Set the bottom brownie layer back in your pan Spread with half of the cream mixture to the edges Layer the second brownie gently on top and cover with the remaining cream mixture smoothing evenly
- Add the Topping:
- Melt chocolate chips for thirty second intervals in the microwave stirring until glossy Spread or drizzle this over the cream layer Alternatively use prepared chocolate frosting for ease
- Garnish and Chill:
- Add your favorite finish chocolate shavings sprinkles or a sift of cocoa Chill uncovered in the fridge at least four hours preferably overnight for cleanest cuts and best texture
- Serve:
- Use a sharp knife wiped between slices for neat squares Serve directly from the fridge so each bite is cool and creamy
 Pin
Pin
The cream cheese filling is absolutely my favorite part My daughter always tries to steal spoonfuls while I’m layering it and we end up giggling Our family now calls this our celebration cake
Storage Tips
Leftovers should be tightly covered and stored in the refrigerator Brownie Refrigerator Cake tastes best eaten within three days but the flavor and texture will stay delicious for up to four days Slice only what you need keep the rest cold and avoid leaving it at room temperature for too long The cream filling can separate a bit after several days so for freshest slices enjoy soon after making
Ingredient Substitutions
For the base use any brownie mix that makes a 9 by 13 pan If you love from scratch brownies you can use your favorite recipe just be sure to bake and cool fully before layering For the filling mascarpone can be swapped for cream cheese and you can use milk chocolate chips or even white chocolate for the topping Gluten free mixes also work beautifully
 Pin
Pin
Serving Suggestions
This cake impresses on its own but you can add a scoop of vanilla ice cream on the side during hot weather Fresh berries make it pop with color and tartness For a birthday or festive gathering press in colorful sprinkles right before chilling so they stick beautifully Try cutting into mini squares for dainty dessert trays or brunch
Cultural and Historical Context
Cold layered desserts like this one are beloved in many American homes often called icebox cakes They became popular when refrigerators first entered kitchens as a fun way to use boxed mixes and creamy fillings My grandma always made refrigerator cakes for summer holidays long before I started baking and this recipe keeps that chilled family tradition alive
Recipe FAQs
- → How long does this chilled brownie dessert need to set?
It's best to refrigerate for at least 4 hours—overnight for firmer layers and smoother slicing.
- → Can I use homemade brownies instead of a mix?
Yes, homemade brownies work wonderfully as the base; just ensure they are fully cooled before layering.
- → Is it possible to prepare this treat ahead of time?
Absolutely; this dessert is ideal for preparing a day in advance, making it convenient for gatherings.
- → What toppings can I add for extra flair?
Decorate with chocolate shavings, sprinkles, or a dusting of cocoa powder for added texture and flavor.
- → How should I store leftovers?
Keep leftovers wrapped or in an airtight container in the refrigerator for up to 4 days.